


OK, i've read the title, wtf is that ? So first i'm going to explain what i'm going to do, and why i'm doing it. When we want to try ubuntu without installing, we have two option,
- Throw the iso into virtualbox and taste the new system.
- Make a live usb disk and boot my computer from it.
Now i want to persist some changes, i installed some packages, created some files, i want to have them when i boot this live system again. Easy, just add some persistent space when creating the live usb. But if i want to do that in virtualbox ? What if i dont want to reboot my pc, i want do my other tasks and want to try out ubuntu in parallel ? Voila! install that ubuntu inside virtualbox. OK, but now i dont want to waste a few gigs of my disk space (not to mention the time to install ubuntu). I want to use persistance with that live system. There was no way till now ![[frown]](/images/smileys/YM11b/frown.gif)
But fear not, Thats what i'm going to do now ![[grin]](/images/smileys/YM11b/grin.gif) I'm gonna make a virtualbox image from ubuntu iso, adding a persistent space with it in the process.
I'm gonna make a virtualbox image from ubuntu iso, adding a persistent space with it in the process.
Requirement
- Virtualbox.
- Unetbootin.
Procedure
I did this in mac, but pretty same process will be applicable for linux too (hopefully). Now head over to terminal and follow the steps.
Lets create a folder and do all the bullshitting inside it.
$ mkdir ubuntulive
$ cd ubuntulive
Lets make a empty 1.0GB image to hold all that bullshit.
$ dd if=/dev/zero of=ubuntu.img bs=1m count=1024
$ ls -lsh
total 2097152
2097152 -rw-r--r--  1 sarim  staff   1.0G Dec 18 02:42 ubuntu.img
Bullshit container creation done, now register this bullshit as disk in the system.
$ open -a Disk\ Utility ubuntu.imgIn Disk Utility, right click on the
ubuntu.imgin the left side pane. SelectOpen Disk Imagefrom popup menu. It'll show a error msg.Now check the disk listing, you'll see a new disk added at the end. It is
/dev/disk6for me.$ diskutil list /dev/disk6 #: TYPE NAME SIZE IDENTIFIER 0: *1.1 GB disk6Yay ! our bullshit disk is registered in the system
Now lets partition the disk. We are going to create a
fat32partition namedUBUNTULIVE.$ diskutil partitionDisk /dev/disk6 1 MBRFormat fat32 UBUNTULIVE 100% Started partitioning on disk6 Unmounting disk Creating the partition map Waiting for the disks to reappear Formatting disk6s1 as MS-DOS (FAT32) with name UBUNTULIVE 512 bytes per physical sector /dev/rdisk6s1: 2093024 sectors in 261628 FAT32 clusters (4096 bytes/cluster) bps=512 spc=8 res=32 nft=2 mid=0xf8 spt=32 hds=128 hid=2 drv=0x80 bsec=2097150 bspf=2044 rdcl=2 infs=1 bkbs=6 Mounting disk Finished partitioning on disk6 /dev/disk6 #: TYPE NAME SIZE IDENTIFIER 0: FDisk_partition_scheme *1.1 GB disk6 1: DOS_FAT_32 UBUNTULIVE 1.1 GB disk6s1Now the
UBUNTULIVEdrive will be mounted in finder. OpenUnetbootin. Select the iso, enter some how much space you want for persistance. Select/dev/disk6s1inDrive. Click OK and Let it finish making the live disk. It happens in a snap in my ssd powered system, your experience may vary.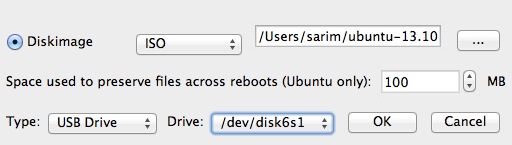
After unetbootin is finished, Go to
UBUNTULIVEdrive. Inside the drive, opensyslinux.cfgin a text editor. (I used Textmate). Add the following lines at the end.label ubnentry6 menu label ^Try Ubuntu without installing in Gittu way kernel /casper/vmlinuz append initrd=/casper/initrd.lz live-media=/dev/sda1 live-media-path=/casper/ file=/cdrom/preseed/ubuntu.seed ignore_uuid boot=casper quiet splash -- persistentSave the file and unmount/eject the
UBUNTULIVEdrive.GUI time is over, back to terminal. Now our image is ready. Convert it for virtualbox.
$ VBoxManage convertfromraw -format VDI ubuntu.img ubuntu_vbox.vdi
Converting from raw image file="ubuntu.img" to file="ubuntu_vbox.vdi"...
Creating dynamic image with size 1073741824 bytes (1024MB)...
Phew! Done
Now open virtualbox. Create a new vm/Edit Existing, in storage section, select Choose Existing Diskand select thisubuntu_vbox.vdithere. Boot the vm, in unetbootin menu, select the last option and press enter to boot.
Notes
- For linux, step 3 to 6 can be done using gparted.
$ gparted ./ubuntu.imgwill do. - This guide is based on ubuntu 13.10. A new boot flag
live-mediais needed for 13.10. That was taken from schmidi2.wordpress.com. If you are using another version, you may ommit the flag in step 8. - Ubuntu ISO and 100MB persistent space fits in 1GB (1024MB) image, but if you want to increase persistent space, you need to increase image size (the
countparam) in step 2 too.
Now, this thing still wasted 2gigs of disk space, didn't it ? So whats the point ? There is none :v you may take it as bullshitting, or a scienctific experiment for educational purposes, your wish. Good luck and Happy linuxing (y)